As a seasoned journalist, I've seen countless digital services promise to simplify our lives, only to complicate the exit strategy. Tinder Gold is no exception. It offers a gleaming suite of features to enhance your dating game, but understanding its lifecycle—from activation to management and, eventually, cancellation—is crucial. This isn't just about swiping right; it's about smart digital citizenship.
This comprehensive guide pulls back the curtain on everything you need to know about your Tinder Gold subscription, ensuring you stay in control, not the other way around. We'll walk through exactly how to activate, expertly manage, and smoothly cancel your premium membership, cutting through the confusion so you can focus on finding your next match, or simply moving on.
At a Glance: Your Tinder Gold Subscription Essentials
- Cancelling isn't deleting: Removing the app or your account does not cancel your Gold subscription. You must manually unsubscribe.
- Benefits stick around: Your premium features remain active until the very end of your current paid billing cycle, even after cancellation.
- How you bought it dictates how you quit: The cancellation process varies based on where you initially purchased your subscription (Google Play, Apple App Store, Tinder.com, or PayPal).
- Refunds are rare: Generally, Tinder doesn't offer refunds for in-app purchases, though exceptions can be made within 14 days of purchase.
- Always verify: After cancelling, double-check your email and the relevant app store/Tinder.com to confirm the subscription status.
The Golden Ticket: Understanding Tinder Gold and Its Siblings
Before diving into the nuts and bolts of getting and managing a Tinder Gold subscription, it helps to understand what you're actually signing up for. Tinder offers a tiered premium experience, each designed to give you an edge in the bustling world of online dating.
Think of it like choosing your level of VIP access at an exclusive club:
- Tinder Plus: This is your foundational VIP pass. It strips away ads, grants you unlimited likes (no more daily caps!), lets you undo your last swipe (hello, second chances!), provides daily Super Likes to show extra interest, and offers a monthly Boost to put your profile in front of more eyes. Plus, you can change your location, perfect for planning dates while traveling.
- Tinder Gold: The true "golden ticket," this tier includes all the benefits of Tinder Plus and adds some game-changing features. Most notably, you get to see who liked you before you swipe, eliminating guesswork and dramatically increasing your matching efficiency. Gold also provides "Top Picks"—personalized selections of profiles curated just for you—and early access to see new likes, giving you a head start.
- Tinder Platinum: At the top of the pyramid, Platinum builds on Gold's offerings. You still get all the Gold benefits, but Platinum users can send a message before matching with someone, giving you a chance to make a memorable first impression. Your likes also get prioritized in other users' feeds, potentially boosting your visibility further.
For many, Tinder Gold strikes the perfect balance between enhanced features and cost. The ability to see who's already interested saves time and frustration, making the swiping process far more strategic. Prices, as you might expect, aren't one-size-fits-all; they can fluctuate based on your region, age, and how long of a subscription you commit to (monthly, quarterly, or annually, with longer terms often offering a better per-month rate).
Deciding to Go Gold: How to Get Your Premium Pass
So, you've weighed the benefits and decided Tinder Gold is for you. Great! Getting started is straightforward, but it's important to understand the different avenues for purchase, as this will directly impact how you manage and eventually cancel your subscription.
The most common ways to subscribe to Tinder Gold are directly through the Tinder app (which uses your device's app store), via Tinder's official website, or sometimes through third-party payment platforms like PayPal.
Getting Gold Through the Tinder App (iOS or Android):
Most users subscribe directly through the Tinder app on their smartphone. This process leverages the payment system of your device's operating system (Google Play Store for Android, Apple App Store for iPhone/iPad).
- Open the Tinder App: Launch Tinder on your device and make sure you're logged in.
- Access Your Profile: Tap the profile icon, usually located in the bottom right corner of the screen.
- Look for the Gold Prompt: You'll typically see banners or prompts advertising Tinder Gold (or Plus/Platinum) within your profile settings. Tap on one of these, or look for a "Get Gold" or "Upgrade to Gold" button.
- Choose Your Plan: You'll be presented with different subscription durations (e.g., 1 month, 6 months, 12 months). Select the one that best suits your needs and budget. Remember that longer terms usually offer a lower monthly equivalent price.
- Confirm Payment: The app will then guide you through your device's native payment interface. This means you'll use the payment method linked to your Google Play or Apple ID account. You might need to authenticate the purchase with your fingerprint, face ID, or password.
- Enjoy Gold: Once confirmed, your Tinder Gold benefits will activate instantly!
Getting Gold via Tinder.com:
If you prefer to manage subscriptions through a web browser or don't have a linked payment method on your mobile app store, you can subscribe directly through Tinder's website. - Visit Tinder.com: Open your web browser and navigate to the official Tinder website.
- Log In: Sign in to your Tinder account using your credentials.
- Access Profile/Settings: Click on your profile icon (usually in the top right corner).
- Find Subscription Options: Look for an option like "Manage Payment Account" or "Upgrade to Gold."
- Select Your Plan: Choose your desired Tinder Gold subscription length.
- Enter Payment Details: You'll be prompted to enter your credit card information, or select another available payment method like PayPal if offered directly by Tinder.
- Confirm: Complete the purchase, and your Gold status will be applied to your account.
A Note on Pricing: Don't be surprised if you see different prices when comparing subscription options between the mobile app and Tinder.com, or even between different devices or regions. Tinder's pricing algorithms can be complex, influenced by factors like your age, location, and ongoing promotions. It's always a good idea to check all available options before committing to ensure you're getting the best deal.
Navigating Your Tinder Gold Subscription: The Management Zone
Once you're subscribed to Tinder Gold, "managing" it means more than just knowing how to cancel. It's about understanding its lifecycle: verifying your active subscription, knowing when it renews, and updating your payment details if needed. A little proactive management can save you headaches down the line.
Checking Your Subscription Status:
The primary way to manage your subscription is by knowing its current status and renewal date. This typically depends on where you made the initial purchase.
- For Google Play Store purchases (Android):
- Open the Google Play Store app.
- Tap your profile icon (top right).
- Go to "Payments and subscriptions" > "Subscriptions."
- Find "Tinder" in the list. Here, you'll see if it's active, when it renews, and options to manage it.
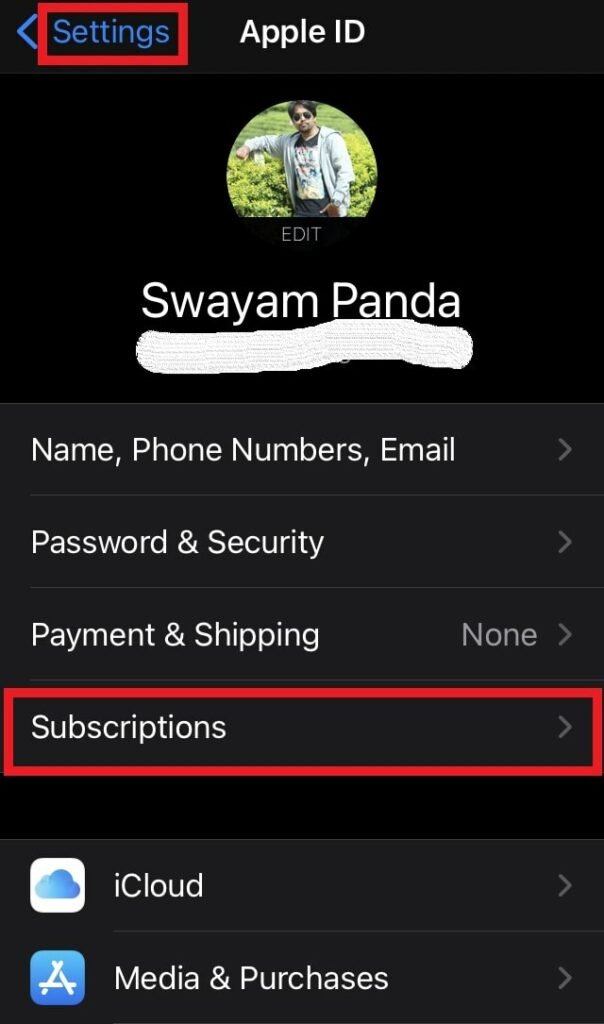
- For Apple App Store purchases (iPhone/iPad):
- Go to your device's "Settings" app.
- Tap your name (Apple ID) at the top.
- Select "Subscriptions."
- Locate "Tinder" in the list. It will display its active status and renewal date.
- For Tinder.com purchases:
- Log in to Tinder.com.
- Click your profile icon (top right).
- Choose "Manage payment account." Your subscription details, including renewal information, will be visible here.
- For PayPal/Other direct payment purchases:
- Log in to your PayPal account (or the respective payment platform).
- Navigate to "Pre-approved payments" or "Automatic Payments" in your settings.
- Find "Tinder" to view its status and next payment date.
Updating Payment Information:
If your credit card expires or you simply want to switch payment methods, you'll need to update this information through the platform where your subscription is managed.
- Google Play Store: Your Tinder subscription uses the default payment method linked to your Google Play account. Update it by going to Google Play Store > Profile icon > "Payments and subscriptions" > "Payment methods."
- Apple App Store: Similarly, Tinder uses your Apple ID payment method. Update it via Settings > Your Name (Apple ID) > "Payment & Shipping."
- Tinder.com: If you purchased directly, you can usually update your payment details within the "Manage payment account" section after logging into Tinder.com.
- PayPal: Update payment methods directly within your PayPal account settings.
Understanding Auto-Renewal:
A critical aspect of managing any subscription is understanding auto-renewal. Tinder Gold subscriptions are designed to automatically renew at the end of each billing period (monthly, quarterly, or annually) unless you manually cancel them. This ensures uninterrupted access to premium features but also means you'll continue to be charged if you forget to unsubscribe. Always be mindful of your renewal date, especially if you're experimenting with Gold for a limited time.
By regularly checking your subscription status and keeping your payment information current, you ensure your Tinder Gold experience is seamless—or that you're ready to make a clean break when the time comes.
The Big Unsubscribe: How to Cancel Your Tinder Gold Subscription
Here's the crucial part. Whether you've found 'the one,' decided premium isn't for you, or just want a break from the dating app scene, cancelling your Tinder Gold subscription requires a few specific steps. Remember this golden rule: deleting the Tinder app from your phone or even deleting your Tinder account entirely does not cancel your subscription. Your subscription is a separate entity, managed by the platform you used to purchase it.
Failure to manually cancel will result in continued charges. Let's walk through the process based on your original purchase method.
1. Cancelling on Android (Google Play Store)
If you bought Tinder Gold through the Google Play Store on your Android device, this is your path to cancellation:
- Open Google Play Store: Locate and tap the Google Play Store app icon on your phone or tablet.
- Access Your Profile: Tap on your profile icon, typically found in the top right corner of the screen.
- Navigate to Subscriptions: From the menu, select "Payments and subscriptions," then tap on "Subscriptions."
- Find Tinder: You'll see a list of all your active subscriptions. Find "Tinder" in this list and tap on it.
- Cancel Subscription: On the Tinder subscription management page, tap the "Cancel subscription" button.
- Follow Prompts: Google Play might ask you to confirm your decision or provide a reason for cancelling (this is optional). Follow any on-screen instructions to complete the process.
- Confirm Cancellation: Look for a confirmation message on your screen. You should also receive an email from Google Play confirming your cancellation.
2. Cancelling on iPhone/iPad (Apple App Store)
For those who subscribed via the Apple App Store on an iOS device, here's how to unsubscribe:
- Go to Settings: Open the "Settings" app on your iPhone or iPad.
- Tap Your Apple ID: Tap on your name (your Apple ID) at the very top of the Settings menu.
- Select Subscriptions: From the Apple ID menu, tap "Subscriptions."
- Find Tinder: Scroll through your active subscriptions until you find "Tinder." Tap on it.
- Cancel Subscription: On the Tinder subscription details page, tap "Cancel Subscription."
- Confirm: A pop-up will appear asking you to confirm your cancellation. Tap "Confirm."
- Verify: The subscription status should change to "Expires on [Date]" instead of "Renews on [Date]." You should also receive a confirmation email from Apple.
3. Cancelling From the Tinder App (if purchased directly)
In some cases, especially if you started your subscription directly within the Tinder app without going through Google Play or Apple (less common, but possible), you might manage it directly there.
- Open the Tinder App: Launch the Tinder app on your device.
- Tap Your Profile Icon: Access your profile, usually by tapping the icon in the bottom right corner.
- Go to Settings: Tap the "Settings" gear icon.
- Find Payment Management: Scroll down and look for an option like "Manage payment account" or "Payment Management."
- Cancel Subscription: Select "Cancel subscription" and follow any subsequent prompts.
- Confirm: Confirm your decision to withdraw the subscription.
4. Cancelling From the Official Tinder Website (Tinder.com)
If you purchased your Tinder Gold subscription directly through Tinder's website, then that's where you need to go to cancel it.
- Go to Tinder.com: Open your web browser and navigate to Tinder's official website.
- Log In: Sign in to your Tinder account using your credentials.
- Click Profile Icon: Click on your profile icon, typically located in the top right corner.
- Choose "Manage Payment Account": From the dropdown menu, select this option.
- Cancel Subscription: You'll see your active subscription details. Click on the "Cancel subscription" button.
- Confirm: Follow any final instructions to confirm your cancellation.
- Verify: Check your email for a confirmation from Tinder.
5. If You Paid with PayPal or Other Automatic Payment Methods
Sometimes, you might link a service like PayPal directly to Tinder for recurring payments. If this is how you paid, you'll need to cancel through PayPal itself.
- Log in to PayPal: Go to PayPal.com and log in to your account.
- Find Automatic Payments:
- On the Summary page, click the "Settings" gear icon.
- From the Settings page, select "Payments."
- Click "Manage Automatic Payments" (or "Pre-approved payments" in older interfaces).
- Identify Tinder: In the list of active automatic payments, find "Tinder" (or "Tinder Inc.").
- Cancel/Stop: Select "Tinder" and then choose "Cancel" or "Stop automatic payments."
- Confirm: Confirm your decision to cancel the recurring payment.
- Verify: You should receive an email from PayPal confirming the cancellation of the automatic payment.
Remember, the key is to go back to the source of the payment. If you're unsure where you bought it, check your email receipts from when you first subscribed—they will indicate if it was Google Play, Apple, Tinder.com, or PayPal.
What Happens After You Hit 'Cancel'? (And What Doesn't)
You've successfully navigated the cancellation maze. Now what? Understanding the immediate and long-term effects of cancelling your Tinder Gold subscription is just as important as the cancellation itself.
Your Premium Benefits Don't Vanish Instantly:
This is a common misconception. When you cancel Tinder Gold, your premium features don't disappear at that moment. Instead, they remain active until the very end of your current paid billing period. So, if you paid for a month on the 1st and cancel on the 15th, you'll still enjoy all your Gold perks (like seeing who liked you) until the 30th or 31st of that month. Only after that date will your account revert to the free version of Tinder. This is a nice grace period, allowing you to maximize the value of your existing payment.
Reactivation Offers: Proceed with Caution:
After cancelling, Tinder might try to win you back with various offers, sometimes tempting you with discounts on reactivation. If your goal is a permanent break or a temporary pause, simply ignore these. They are part of Tinder's strategy to retain subscribers.
Your Account, Matches, and Messages Remain Intact:
Cancelling your Tinder Gold subscription does not delete your Tinder account. Your profile, photos, matches, and message history will all still be there. You'll simply be using the free version of Tinder, with its limitations (e.g., daily swipe limits, ads, no "see who liked you" feature). This means you can continue to use the app, swipe, and chat with existing matches, just without the premium bells and whistles.
Reactivating is Easy:
Changed your mind? If you decide you miss the Gold benefits, you can reactivate your subscription at any time. Simply follow the same steps you took to initially purchase it. Your saved payment method (if still valid) will likely make the process quick and easy.
Personal Data Deletion is a Separate Process:
This is a crucial distinction. Cancelling your subscription stops future payments for premium features. It does not automatically delete your personal data from Tinder's servers. Your profile, photos, conversations, and account history are still stored. If you want to permanently delete your personal data and your entire Tinder account, you must initiate a separate account deletion request through the Tinder app's settings or by contacting Tinder support directly via their help center. They may require verification to ensure it's you requesting the deletion.
By understanding these distinctions, you can confidently manage your Tinder presence, knowing exactly what to expect when you step away from the premium experience.
Troubleshooting Common Cancellation Hurdles
Sometimes, the cancellation process isn't as smooth as tapping a button. Here are a few common issues and how to tackle them:
- "I can't find my subscription in Google Play/App Store!"
- Check the right account: Ensure you're logged into the exact Google or Apple ID that was used to make the purchase. Many people have multiple accounts.
- Check the right platform: Did you buy it on Tinder.com or via PayPal? If so, it won't be in your app store subscriptions. Go to Tinder.com or PayPal instead.
- Expired already? If the subscription period has already ended, it might not appear as an "active" subscription to cancel, but rather as an "expired" one.
- "It says my subscription is active, but I was charged after cancelling!"
- Verify the cancellation date: Did you cancel before the renewal date? If you cancelled just before the renewal and the system hadn't fully processed it, a charge could occur.
- Check for confirmation: Did you receive an email confirmation of cancellation? If not, the cancellation might not have been completed. Go back and redo the steps carefully.
- Contact support: If you have undeniable proof of cancellation (like a confirmation email) but were still charged, immediately contact Tinder support and provide them with all relevant details and screenshots. Also, contact your bank or payment provider to dispute the charge.
- "The 'Cancel Subscription' button is missing or grayed out."
- This usually means the subscription is already cancelled or has expired, or you're looking in the wrong place. Double-check your active subscriptions list for its status.
- If it's truly active and the button is missing, you'll need to contact Tinder support directly for assistance.
- "I provided a reason for cancellation; will it affect my account?"
- No. Providing a reason for cancellation is almost always optional and used purely for statistical purposes by Tinder to understand why users leave. It won't negatively impact your account or ability to use the free version.
The key to resolving most issues is knowing where you purchased the subscription and methodically following the steps for that specific platform. When in doubt, always refer to your initial purchase receipt for clues.
The Refund Question: Getting Your Money Back (or Not)
Let's talk about refunds, a topic that often comes with dashed hopes in the world of in-app purchases. Generally, Tinder's policy (like many other app developers) is quite strict: refunds are not offered for in-app purchases, including premium subscriptions.
This "no refund" stance is largely because you've received the immediate benefit of the service, even if you change your mind shortly after purchasing.
However, there are exceptions:
- 14-Day Window: The most common exception is if you request a refund within 14 days of purchasing a subscription. This is often a consumer protection standard in many regions. If you purchase Gold and immediately realize it's not what you expected, or you bought it accidentally, this 14-day window is your best shot.
- Technical Issues: If you experienced a significant technical issue that prevented you from using your subscription benefits (e.g., Gold features didn't activate), you might also be eligible for a refund.
- Unauthorized Purchases: If your account was compromised and a subscription was purchased without your consent, you should definitely seek a refund.
How to Request a Refund (If You Qualify):
The method for requesting a refund also depends on where you made the purchase: - For Google Play Store purchases (Android):
- Go to the Google Play Help website (support.google.com/googleplay).
- Search for "Request a refund for Google Play purchases."
- Follow the instructions, which typically involve filling out a refund request form.
- For Apple App Store purchases (iPhone/iPad):
- Go to reportaproblem.apple.com in a web browser.
- Sign in with your Apple ID.
- Find "Tinder" in your purchase history.
- Click "Report a Problem" or "Request a refund" next to the Tinder purchase and explain your reason.
- For Tinder.com or PayPal purchases:
- Contact Tinder's support team directly through their help center on Tinder.com.
- Provide all relevant details: transaction ID, date of purchase, amount, and a clear explanation of why you believe you're entitled to a refund.
- For PayPal, you can also initiate a dispute through the PayPal Resolution Center if Tinder support is unhelpful.
Important Considerations for Refunds:
- Be Polite and Clear: When contacting support, be courteous, concise, and provide all necessary information.
- Proof is Power: Have your purchase receipts, transaction IDs, and any relevant screenshots ready.
- Don't Expect Miracles: Even with a valid reason, a refund is not guaranteed. Tinder and the app stores reserve the right to deny requests.
While it's always worth trying if you believe you have a legitimate case, the safest approach is to be absolutely sure you want Tinder Gold before you subscribe, to avoid the hassle of seeking a refund.
Verifying Your Cancellation: Peace of Mind in a Digital World
You've gone through the steps, clicked the buttons, and confirmed. But in the digital realm, a final verification step is crucial for true peace of mind. Trust, but verify, as the saying goes. This ensures you won't be hit with unexpected charges down the line.
Here's how to confirm your Tinder Gold subscription has been successfully cancelled:
- Check Your Email Inbox (and Spam!):
- Almost immediately after successfully cancelling, you should receive a confirmation email. This email will come from the platform where you purchased the subscription (Google Play, Apple, Tinder.com, or PayPal).
- Crucially, check your spam or junk folder. Automated emails sometimes end up there. This email is your primary proof of cancellation. Save it!
- The email should explicitly state that your subscription has been cancelled and usually indicates the date until which your premium benefits will remain active.
- Re-check the Subscription Management Area:
- Google Play Store (Android): Go back to Google Play Store > Profile icon > "Payments and subscriptions" > "Subscriptions." "Tinder" should now show a status like "Cancelled" or "Expires on [Date]" rather than "Renews on [Date]."
- Apple App Store (iPhone/iPad): Go back to Settings > Your Name > "Subscriptions." Under Tinder, it should indicate an expiration date, not a renewal date.
- Tinder.com: Log back into Tinder.com, go to your profile icon, and select "Manage payment account." Your subscription status here should reflect the cancellation.
- PayPal: Log into PayPal, go to "Manage Automatic Payments," and confirm that Tinder is no longer listed as an active automatic payment, or that its status is "Cancelled."
- Check Your Bank/Credit Card Statements (Later):
- While not an immediate verification, it's wise to cast a quick eye over your bank or credit card statements in the month following your intended cancellation. Ensure no further charges from Tinder (or Google Play/Apple/PayPal for Tinder) appear.
Why this verification is so important:
Digital systems can sometimes glitch, or you might have missed a final confirmation step. A confirmed cancellation email and an updated status in the respective management portal are your strongest defenses against being charged for a service you no longer want. Keep these records handy for a few months.
Beyond Gold: Is It Really Worth It?
Now that you're an expert in getting, managing, and cancelling Tinder Gold, you might find yourself pondering a larger question: Is Tinder Gold worth it? For some, the ability to see who liked them, coupled with Top Picks and ad-free browsing, is an invaluable time-saver, a strategic advantage in the bustling digital dating scene. For others, the core free experience of Tinder is perfectly adequate, or the added cost doesn't translate into enough tangible benefits to justify the expense.
The answer often hinges on your personal dating goals, how much time you spend on the app, and your budget. If you're a heavy user seeking efficiency and specific matches, Gold can genuinely streamline your experience. If you're a casual swiper or enjoy the surprise element of matching, the free version might be all you need.
Taking Control: Your Tinder Journey, Your Terms
Ultimately, managing your Tinder Gold subscription is about empowerment. You've now got the knowledge and the step-by-step instructions to navigate the premium features of Tinder on your own terms. From the thrill of upgrading to the strategic choice of canceling, you're no longer at the mercy of automated renewals or confusing settings.
Whether you're diving headfirst into the enhanced dating pool with Gold, taking a strategic pause, or gracefully exiting the premium features, these instructions ensure you stay in the driver's seat. Your dating journey is personal, and so should be your control over the tools you use to navigate it. Use this guide to make informed decisions, save yourself from unwanted charges, and confidently manage your digital life, leaving you free to focus on what truly matters: making genuine connections.